*Tower Blitz* starts you off with just one tower, but as you progress through the game, more towers become available—each with its own unique strengths and weaknesses. Choosing the right combination can make or break your strategy, especially on tougher maps and difficulties. To help you build a winning defense, here's a complete tier list of all towers in *Tower Blitz*, ranked from S-Tier to D-Tier based on performance, cost efficiency, and versatility.
Recommended Videos
Table of contents
All Towers In Tower Blitz Ranked
S-Tier Towers
A-Tier Towers
B-Tier Towers
C-Tier Towers
D-Tier Towers
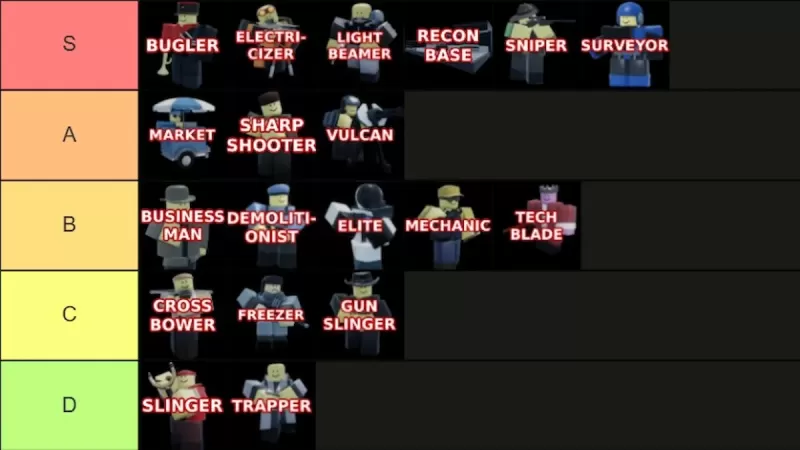
Image by The Escapist
We’ve ranked every tower in Tower Blitz from S-Tier to D-Tier, based on their abilities, upgrade paths, cost, and overall effectiveness. S-Tier towers are top performers that can carry you through even the toughest challenges when used correctly. A-Tier towers are strong but have minor drawbacks that keep them out of the highest rank. B-Tier towers are average—decent, but not essential. C-Tier towers are generally underwhelming, though some players may find niche uses for them. And finally, D-Tier towers are best avoided unless you're playing on Normal difficulty.
You’ll find our full breakdown below.
S-Tier Towers
| Tower | Cost | Explanation | Pros and Cons |
|---|---|---|---|
 | To unlock: 2500 Tokens (Level 25) To place: 750 Cash | One of the most powerful support towers in the game. It significantly boosts the performance of all other towers, making it nearly essential in Expert mode. Note: Does not affect Recon Bases. | + Massive performance boost to all towers + Essential for Expert mode – Support-only tower |
 | To unlock: 5500 Tokens To place: 3800 Cash | This tower combines high damage with massive range, making it ideal for late-game setups. Position it near the end of enemy paths for maximum impact. | + Extremely high damage and range + Dual-purpose (support and offense) – Expensive |
 | To unlock: Complete the contract To place: 1800 Cash | A powerhouse tower with devastating beam attacks. Best placed facing straight enemy paths. Both upgrade paths are strong, though this tower is not viable early on due to its cost. | + Exceptional damage output + Excellent crowd control – Not effective early-game – High cost |
 | To unlock: 8000 Tokens (Level 45) To place: 1000 Cash | This tower continuously spawns operatives that fight alongside you. Upgrading enhances their power, making this an excellent choice for Expert mode. Top path recommended for optimal results. | + Spawns units continuously + Strong upgrade paths – Costly upgrades |
 | To unlock: 1500 Tokens To place: 500 Cash | The best early-game tower available. While some may consider it slow, taking the bottom path improves its fire rate. Useful throughout the entire game, especially in Expert mode. | + Top-tier early-game performance + Effective mid- to late-game + High piercing damage – Somewhat slow firing |
 | To unlock: Complete the contract To place: 700 Cash | An extremely flexible tower that can be used both offensively and defensively depending on your chosen path. Useful from start to finish, though limited to four placements at once. | + Highly versatile + Can be used across all stages of gameplay – Max placement limit of 4 |


![Taffy Tales [v1.07.3a]](https://imgs.xfsxw.com/uploads/32/1719554710667e529623764.jpg)